Block: hero
Challenging Orlando Golf Course
Designed to Inspire and Challenge Every Golfer
Block: centered_content
Our championship course provides an uninterrupted golf experience that showcases Florida’s natural beauty. Behind the lush fairways and serene landscapes is a thoughtfully designed course, built for strategy. Created by the renowned Arnold Palmer Design Company, every hole presents a new challenge and makes for a rewarding game that keeps even the most seasoned golfers engaged.
Block: golf_course_holes
Course Guide
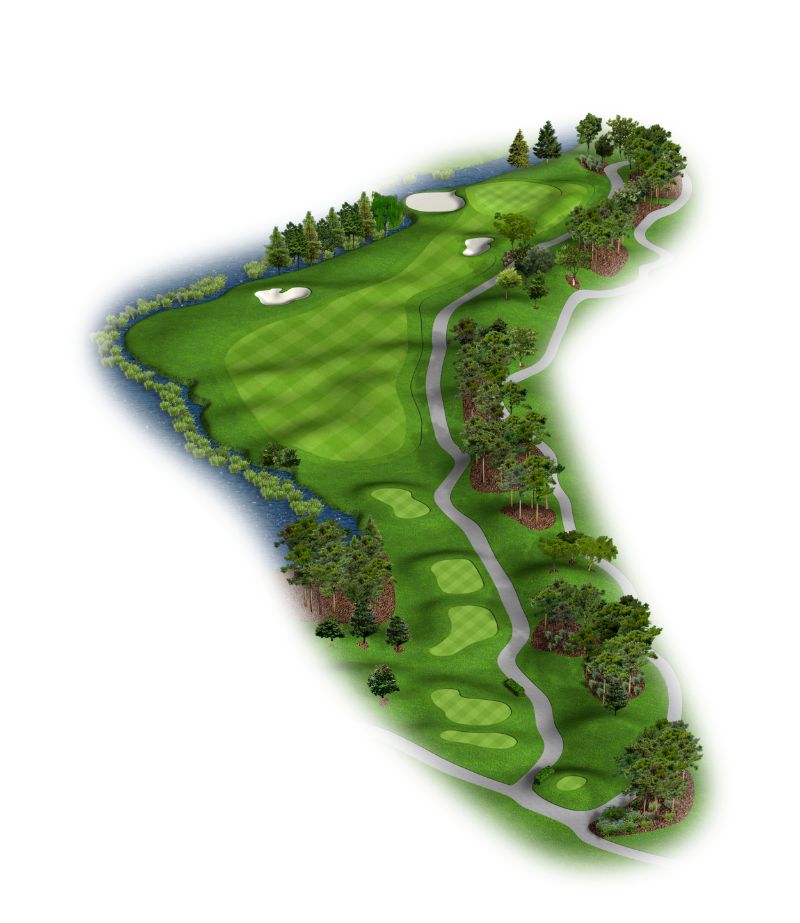
Whether you’re a casual golfer or a professional, our course offers undulating greens, strategic bunkers and a mix of drivable par-4s and lengthy par-4s and 5s, providing a wealth of options and challenges to consider during your round. In each of the following hole descriptions we’ve identified the most important feature, or TMIF, to help you get to the heart of the strategy of each golf hole.

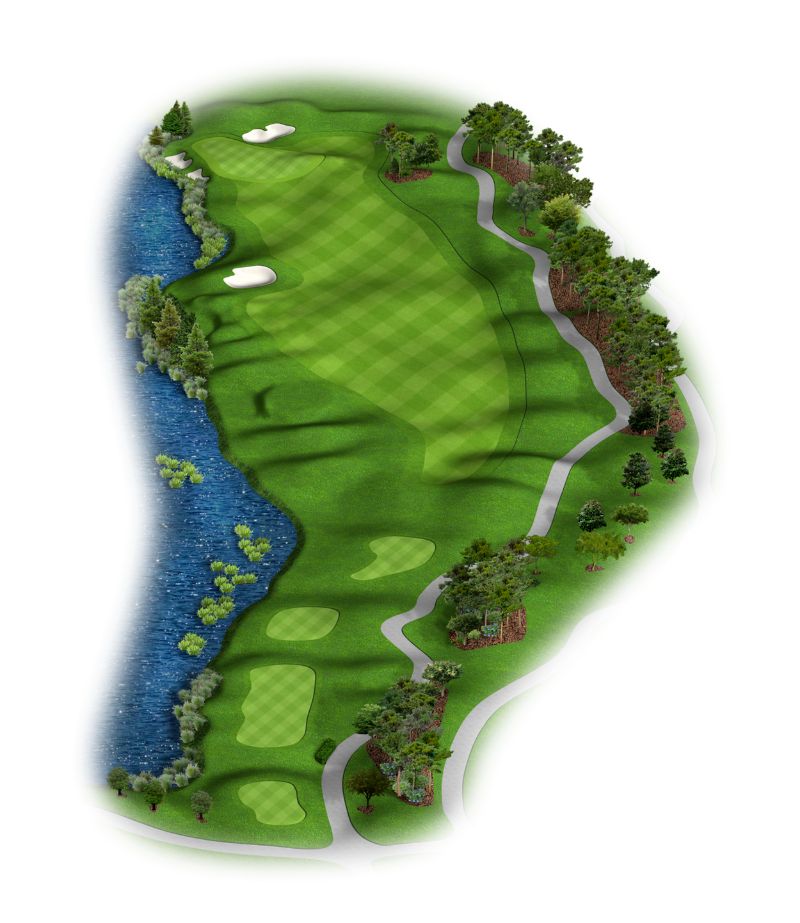
01
Sunrise
+Par 4, 403 Yards
TMIF: A double-plateau green with an array of pinnable locations from very easy to most difficult
The opening tee shot must navigate a small bunker on the inside of the dogleg but there is a generous amount of fairway to the right. However, the double-plateau green gets progressively more difficult to hit the further right one plays. Beware of the water that sidles up very close to the left edge of the green that adds difficulty to tee shots that shy away from the fairway bunker.

02
Boldness and accuracy are required to successfully cover the coquina bunker protecting the left side of the fairway. This will set up the best angle and shortest distance to navigate the second landing area that is guarded by a small pot bunker just left of the middle of the fairway and 60 yards from the green. Once again, left is the preferred line here to open up the best view into a small green. A deft pitch is needed to place the ball near the pin as the front quarter of the green slopes toward the player while the remainder of the putting surface works slightly away.

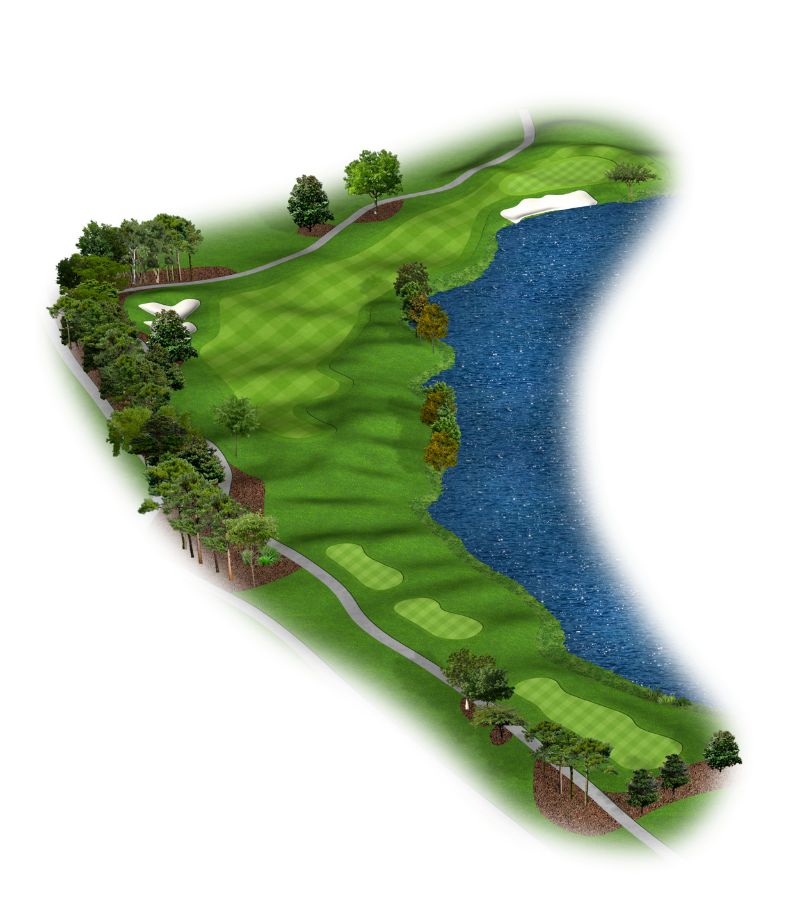
03
A bit of reverse strategy is required to set up an optimal line into the green. Tee shots that play nearest the fairway bunker on the outside of the dogleg will avoid being blocked out by the cypress trees along the lake on the right and will have a superior angle into this multi-tiered putting surface flanked short and right by a beach bunker that gains depth as it nears the green.

04
With only one small, thoughtfully placed bunker amidst an exceedingly liberal amount of fairway, this short par 4 looks pretty easy from the tee…. but don’t believe it! The difficulty lies in the approach to this elevated and boldly contoured putting surface. The trick here is to hit it just as close to the fairway bunker as you dare to leave the best angle to hold the green. If you miss, which most will, consider the putter as your weapon of choice to get the ball back on the green.

05
A word of advice: don’t go right! Pins cut on the right half of this boldly contoured green will tempt you, but don’t fall for it as the slightest miss right will face an almost impossible prospect of saving par. No matter the flag location, the most prudent play here is towards the left side of the green.

06
Avoid the massive mound bracketing the left side of the fairway to insure visibility into the green. But be careful not to play too far to the right as tee shots hit on the right half of the fairway will have an inferior angle and a longer second shot. While a front right hole location next to the water may look daunting, a cunning approach over the greenside bunker should funnel the ball just as close to the hole as the direct route.

07
While it’s debatable if this is the longest par 3 or the shortest par 4 on the golf course, no one will argue that a wood of some sort is needed to reach the green. Just behind the high point of the waste bunker starts a ridge line that travels up to the green, splitting the putting surface diagonally into two distinct tiers. Merely hitting this boldly contoured green in regulation can be the easiest part of the equation, so make sure you club appropriately.

08
The ideal line is down the left side as close to the fairway bunker as you dare. This will leave the shortest distance and best angle to contend with the lake that guards the most favorable line into the green. The closer one plays to the lake, the easier the next shot becomes. In the rare occasion when the pin is set on the front left of the green, play away from the lake to have the best line to the hole.

09
Zach’s Revenge
+Par 4, 505 Yards
TMIF: A crushed shell native area that protects the shortest line to the hole
Weighing in at just over 500 yards, this is easily the longest par 4 on the golf course. A long drive in the center of the fairway is the best position to have a chance to cover the native area with the approach shot. The vast green is elevated and protected on the left by a deep trap. The miss here is to the right of the green where a generous amount of fairway awaits.

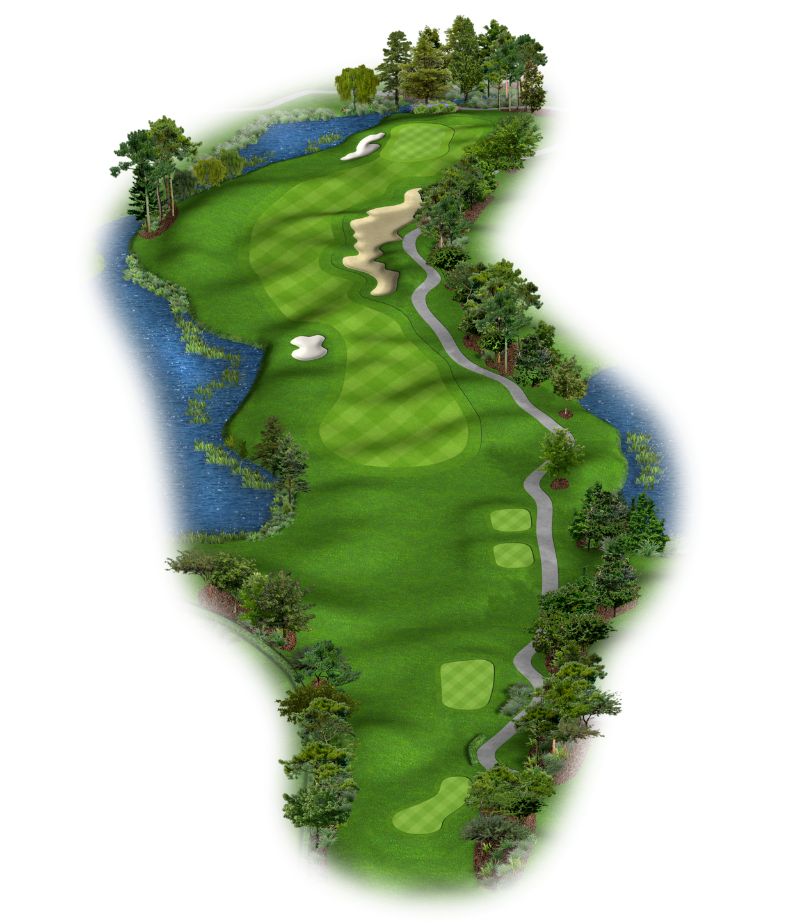
10
Mosquito Cove
+Par 4, 399 Yards
TMIF: The pit bunker which cuts across the fairway short of the green
This diminutive par 4 with plenty of width off the tee rewards bold play over the left fairway bunker with a clear view of the small and subtly contoured green. A deep pit of sand cuts across the front of the green and sets up a forced carry from this angle. Golfers who opt to play safely out to the right will have to contend with the mound that shrouds the green to reach in regulation.

11
A high ridge line arcs diagonally across the fairway bidding the golfer to hit their best drive to gain a view of the green. For the best angle of approach, play left of center but choose your line wisely as the peak of the ridge gets progressively longer to carry as it works to the left side of the fairway. Beware of the small mound that lurks just left of the green’s front. Shots hit left of this mound will face a challenging recovery.

12
Situated in a hollow of a long ridge that runs at an oblique angle to the fairway, the twelfth green is best accessed by playing down the right side. The green gets progressively more shallow and the greenside bunker gets more difficult to navigate the further one plays down the left side.

13
Play as close to the canal as you dare for the best route to the green. A solid drive that finds the fairway will leave a decision to play short, left, or long of the fairway bunkers that set up the right side of the second landing area. This narrow but very deep green is hemmed in on both sides by strong mounding and bunkers. It will make for some challenging recovery shots for those who miss and daunting two putts for those who reach the green but aren’t close to the hole.

14
Reachable par 4s can be fun if the right balance between risk and reward is struck. A solidly struck straight drive can easily reach the green, setting up a tempting proposition from the tee. But then there is the matter of the water rambling along the entire left side of the fairway before wrapping behind the green. The large putting surface is also protected at the front by a tactically placed pot bunker.

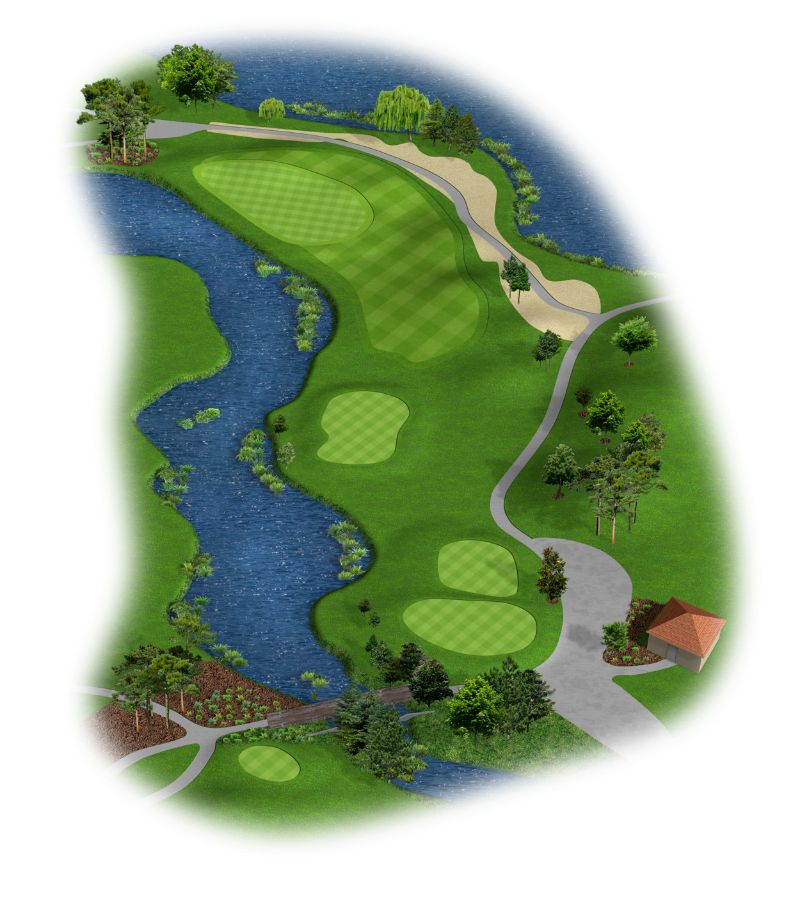
15
The shortest but by no means the easiest par 3 on the course, the fifteenth hole features a small green positioned precariously close and pitching strongly toward the adjacent wetland. Center of the green is the smartest play no matter the pin placement. Shaping your shot to make use of the right to left slope is advised to access a back left hole position.

16
This reachable par 5 offers a generous amount of room off the tee. The challenge begins on the placement of the second shot. A small internal mound that juts into the front center of the green separates the green in two. Depending on which side of the mound the pin is cut, you’ll want to be on that side to avoid a challenging recovery.

17
Rising some 5 feet from front to back, this long par 3 situated near the water requires bold play to reach the putting surface. Bunkers left and short right make pin positions near the edges of the green difficult to get close. Clever use of the internal contours of the green is advised versus a direct approach to score well.

18
A distinct ridge saunters through the center of this wide fairway, setting up two distinct levels from which two play. The higher inside fairway is the preferred route most of the time as it provides the best view into the green and the shortest distance. For pins cut on the very front of the green, the lower level provides a better angle into the green.
Hole Details
01
Sunrise
Par & Yardage: Par 4, 403 Yards
TMIF: A double-plateau green with an array of pinnable locations from very easy to most difficult
02
Ishmael’s Gift
Par & Yardage: Par 5, 561 Yards
TMIF: The small pot bunker in the middle of the second landing area

03
Panther Lake
Par & Yardage: Par 4, 393 Yards
TMIF: A stand of cypress trees
04
A Hole Remembered
Par & Yardage: Par 4, 402 Yards
TMIF: The crowned and incredibly difficult-to-hit green

05
Lone Pine
Par & Yardage: Par 3, 190 Yards
TMIF: A deep valley just right of the green

06
Gator Galley
Par & Yardage: Par 4, 428 Yards
TMIF: A massive mound inside the left corner of the dogleg

07
Four Corners
Par & Yardage: Par 3, 244 Yards
TMIF: A diagonal ridge line

08
Handshake
Par & Yardage: Par 5, 610 Yards
TMIF: The lake

09
Zach’s Revenge
Par & Yardage: Par 4, 505 Yards
TMIF: A crushed shell native area that protects the shortest line to the hole
10
Mosquito Cove
Par & Yardage: Par 4, 399 Yards
TMIF: The pit bunker which cuts across the fairway short of the green

11
Outlaw
Par & Yardage: Par 4, 459 Yards
TMIF: Hog’s back

12
Nip and Tuck
Par & Yardage: Par 4, 391 yards
TMIF: Green angle

13
Skillit
Par & Yardage: Par 5, 570 Yards
TMIF: Canal

14
Roulette
Par & Yardage: Par 4, 325 Yards
TMIF: Pot bunker

15
Young Sol
Par & Yardage: Par 3, 191 Yards
TMIF: Slope
16
Emma
Par & Yardage: Par 5, 483 Yards
TMIF: The bump

17
Tobias’ Fire
Par & Yardage: Par 3, 220 Yards
TMIF: Elevation

18
Sunset
Par & Yardage: Par 4, 439 Yards
TMIF: Split-level fairway
Block: custom_block
Scorecard
Before you hit the course, take a glance at our scorecard to familiarize yourself with the course layout and rules.
Block: centered_content